SCAD x PowerHouse VFX Week 5
- Poonya Tunkakutiya
- Oct 10, 2022
- 2 min read
Updated: Oct 15, 2022
Shooting Day!
After going back and forth with the security and building management team, Joleen was able to reschedule our shooting day! One day before the shoot, we went to collect some equipment such as a camera, lights, and some other necessary. It turns out that Joleen booked a whole truck worth of equipment (which I find very funny as non of us are actually film major.)
We started setting up our scene at around 7pm and were able to finish everything at around 11pm. It was a long day, but I think we all enjoyed the process of it a lot. With the help of our amazing friends who we asked and volunteered to help on set, we were able to get some amazing footages.
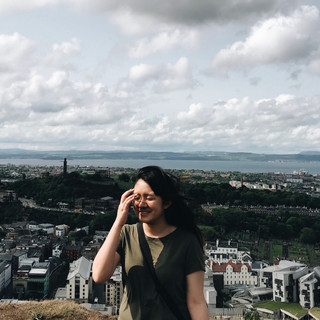
Joleen and Nick are mainly taking care of the direction of the shots, while Deja and I helped assisting and collected RAW images for HDRI and lighting references. Here are some behind the scene photos that I took during the shoot.
Also a big thank you to Professor Bridget, who oversaw the entire process (and ended up holding a light in one of the shots). Here are some behind the scene photos that I took!


Throughout the shoot, Nick captured a HDRI using a 360 camera. However, we also use a more traditional approach using a chrome ball for a back up too. With the help of Deja, I took photos of the chrome ball with different exposures for later assemble in Photoshop.


Here is a photo of me taking a photo of the chrome ball!

Photogrammetry
After our shooting on a Friday night, I quickly scanned the actors arm. Again, the quality is far from perfection, however, we got the information we need. I was working with Deja to plan out which part exactly we want for the CG integration to be. Then, we asked our make up artist to draw the lines for us to keep track of where the models will be.

Agisoft Photoscan

Autodesk Maya
From this, I am now able to adjust my model with more accuracy.
Materials
Moving on, I created some quick customized materials using Substance Designer for our 3D models. These materials included brushed metal, carbon fiber, and variation of hard plastics.

Materials made in Substance Designer

Here are some more references that I gathered.


After creating some customized materials, I started to texture my model in Substance Painter. Here are some work in progress.


I tried to render my materials in Maya, however, this is my first time, I was struggling to get the material right. With the help of my friend outside of class, I was able to create some materials showcase.


The model still needs a lot of material work. This is a new pipeline as I have only been rendering my models and textures in real-time software such as Unreal Engine. This is a big challenge for me to dig deep into Maya Shader. I was creating my materials with the combination of Substance Painter and AI Standard Surface. This is the first time I am learning about IOR and some other options found in Maya. I definitely find it very fascinating on how powerful Maya can be.

In the end, I was able to create a turntable of the arm model.

Comments