JAPANESE CLASSROOM DURING BUNKASAI
Real-Time Game Environment


Responsible for all aspects. Except some graphics were found online, while the boxes and some textures, such as cardboard and paper normal, are from Quixel.
Software Used: Autodesk Maya, Unreal Engine 4, Photoshop, and Substance Suite (Painter, Designer and Sampler)
Pre - Production
This project is created from a concept that was developed from my first environment in Unreal Engine back in 2020. For this project, my aim is to push the realism of the environment as much as I can within the span of 10 weeks.
My original concept is a Music Club room in a Japanese high school. However, when it comes to this project, I wanted to push it more to fit with my desired aesthetic. I was looking into Cultural Festival, which also known as Bunkasai (文化祭). It is an annual open day held around October and November in schools and universities in Japan.
Reference
Before I began, I was gathering as many references as possible. I used PureRef to contain all the images as it is very easy to access and carry around. When I was gathering the references, I was also looking for the dimensions of each object in order to make each model as realistic as possible. I continue to add more images as the project progresses. This is what I have in the end.

Concept
In the beginning stage, I made a super quick concept art to help visualize my goal. I mainly used photo bash with a screenshot of a blockout in Unreal Engine to get the perspective and proportion right.

Photobashing done in Procreate
Production
Building The Scene
I started off with a block out in Autodesk Maya. This is to ensure the dimension of the room in comparison with actual humans and some other objects. Then I cut the block out into smaller pieces for further modular assets development. Once I got the first version of the architectural modular assets, I started to place them into Unreal Engine to give myself a better visualization of the scene.


As I went along, I wanted the main focus of the classroom to be in the front area where I placed all the musical instruments.


Lighting
For this project, I wanted to nail the lighting as much as I possibly could. I was looking at different lighting references to get a better understanding of how light works in that time of the day and how other artist does it. Then I tried to create the light that would fit my desired aesthetic the most based on the knowledge that I gained.


Light Source
I used a combination of HDRI and point lights to light this scene.


LUT
I also used LUT to make the scene brighter and manually create global illumination. LUT gives me the ability to fix the light using Photoshop.

A screenshot before adjustments

After the adjustments and applied on LUT
Baking
Throughout the process, I keep baking my lighting so I can always see how it affects the new asset that I put into the scene. I usually bake it at medium so it doesn't take too much of my working time.
Texturing
Substance Suite
I texture my asset with a combination of the three texturing software, Substance Painter, Designer, and Sampler.
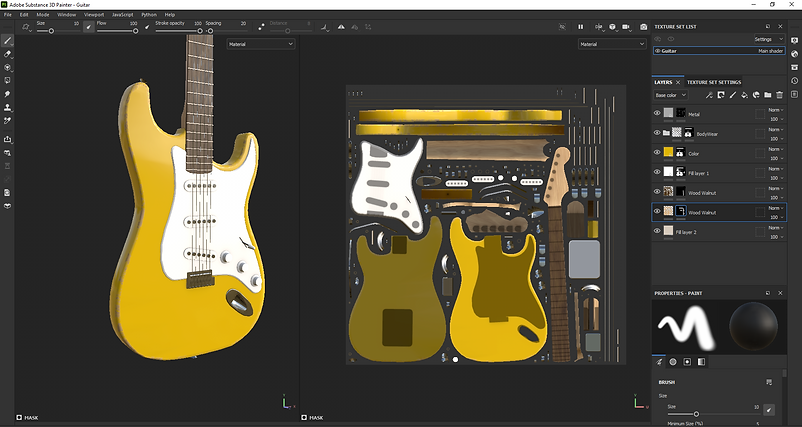
Substance Painter
Substance Painter is used to texture most of my assets. Throughout this project, I got a lot faster as I became more experienced with the program, especially with baking. It saves me a lot of time to texture each of my assets as I can use smart masks to help me quickly generate micro details on the asset itself. For some assets, such as a hero or larger assets, I will also do some manual hand painting on the details too.
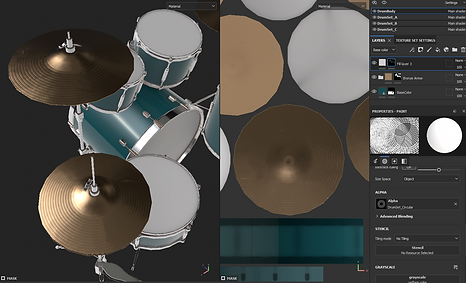
Substance Sampler
I used Substance Sampler to quickly generate the floor and concrete texture of the classroom. It is a quick and easy process that gives me high quality tileable textures that I can further use in both Substance Painter and Designer.

Substance Designer
For this project, I used it for textures such as the acoustic roof, textured hard plastic, and more customized details in the existing texture. For example, I used it to create an older version to the floor texture that I created in Substance Sampler. I also used it to create some alpha maps that I further used in Painter.


Hero and Modular Assets
Hero Asset


Modular Asset


Balloon Material
In this project, I got a chance to explore the material settings in Unreal Engine even further. I created a balloon texture in the same way bubbles are created with fresnel and some refraction effects. Here is my setting for the material.

At the beginning of the project, my balloons did not have transparency, which got pointed out by a lot of people, whether it was my peers or professors. I tried to follow some bubble material tutorials to create a similar effect, however, the problem is that bubbles in Unreal Engine do not cast or receive proper shadow. After changing my directional light from moveable to static, it still did not solve the problem as much as I wanted to. So I decided to change the shading model to Two sided foliage, which was inspired by the trees that I placed on the exterior environment. That did not solve my problem either. So that will definitely be one thing to keep learning in the future for me.

Before

After
Atlas Map & Trim Sheet
Atlas map and Trim sheet were two big things that I decided to be a big part of what I want to achieve in this project. As this is my first time putting my knowledge into use, I decided to stick to smaller assets, including the flags, small lanterns, books, papers, and signs.
Books & Notes
I created an atlas map with a bunch of book covers, music notes, and some pages inside of the book. Then I created the assets and layout my UV according to the texture that I have.

Texture Sheet


Assets
Decorative Assets
I created a 4*4 grid that contain different sets of colors. Then I create the assets' UVs based on the row of colors so that I can create material instance that can pick which ever color sets I want when set dressing in Unreal Engine.


UVs

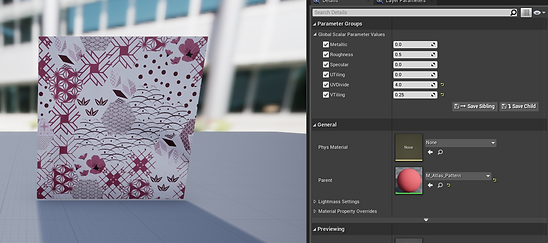
Material Instances


Examples in engine

Material Set Up
Signs
I created a black and white texture to use as an alpha for each sign. By assigning specific UVs on to the texture and creating some hand made light map UV, I was able to create material instances that could change the color or texture combination in real-time. I had to manually generate a light map for each of the signs in order for this to work since the decal UV is going to be on the second UV channel. (As I was writing this, I realized that I could possibly get away with not creating my own light map if I set the decal UV in the third UV channel. I will probably try to explore that on my next project.)

Alpha Trim Sheet


Material Instance

Material Set Up


I can also use other textures as the background since I made it an instance. For example, I switch out the base color with cardboard material instead. This gives the assets more variety.
Decal
Other than small decoration assets, I also use texture atlas for decals by creating instance material. By creating an instance, it allows me to pick and choose each decal in real-time.


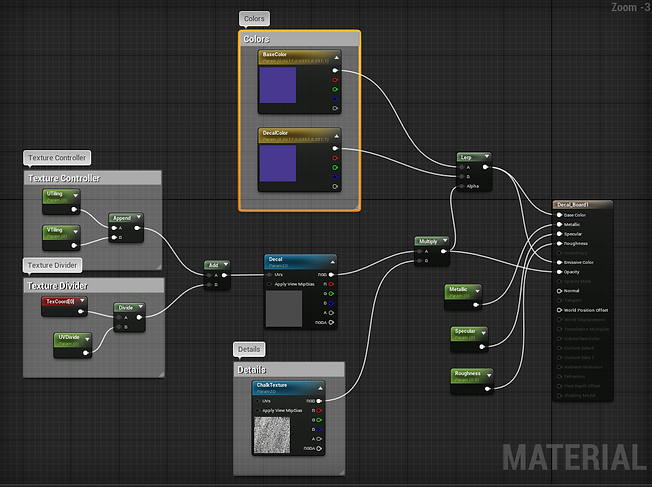
Material Set Up

Material Instance
Small assets
To save some UV space, I combine UVs of some smaller assets together. Not only saving the draw calls in Unreal, but also saving some of my time to texture those assets too.

Vertex Painting
To give the floor some aging, I created two versions of the floor materials. The new version is created using Substance Sampler, while a worn version is created in Substance Designer using the first texture from Sampler. Then I used vertex painting in Unreal to create a variety to the floor.

Material Set Up
Vertex Painting in Unreal Engine

Worn Floor

New Floor
Foliage & Random Color
When I was doing some research on materials, I found a tutorial that shows how to create random colors for foliages everytime each of the mesh is placed. I used this with my balloon materials since I need the variety in colors. This helps me save a lot of time set dressing the scene and also automatically generate colors for each of the balloons.

Placing meshes using foliage tool
Material Set Up (Base Color)
Spline
Wire
I decided to use a spline blueprint to generate wires in the scene. Mainly because it allows me to change it however I want according to the scene and the current setdressing.
Post-Process
I used post processing to create and adjust the lighting, especially to help generate the global illumination without overly exposing the scene. I also add some grainy effects for nostalgic feeling. I also added a little bit of Acrobatic Aberration to give it a dreamy look. Further than that, I also used LUT for further color grading. Here is my setting.


Progress Images
Since the beginning of the project, I have placed a few cameras to capture screenshots of the environment process so I could see how the project changed over time.

Post-Production
Cinematics and screenshots
One of my most favorite parts of creating an environment is to create cinematic and screenshots. I had a background in both photography and cinematography before I decided to become a game artist. Creating a video for each project allows me to get in touch with my other passions. They are not perfect as I have not been practicing my skills for a while now, but I do enjoy it a lot!


I played around with rule of third as well as some depth of field transitions to enhance the beauty in each shots. Focal Length are also various in different cameras. I tend to use a lower focal length for shots that contain a lot of information. Most of the aperture were 2.8, however, I bumped some of them up to 12 for wider shots so non of the assets will be out of focus.
Reflection
Master in post processing
That is one thing that has been on my wish list for a while now. Since I have been working with cameras and video editing, I feel like it is something that I personally should be able to master. I feel like I did not get to use it as much as I should even in this project. I also wanted to try color grading, but I was still afraid to go beyond my comfort zone, so that will definitely be my goal for my next project.
Atlas Maps and Trim Sheet
I would say that this is one of my highest achievements for this project. I may not be able to use it with the majority of my scene, however, I felt like this is a good start. Now, I have a strong basic understanding of how it works and I can’t wait to use it more in the future!
Story-Telling
Overall, I am pretty happy with what my project turned out to be. There are definitely rooms to push it even further, whether it is set dressing or asset creation. One big feedback that I felt I could not achieve with the time frame that I have is definitely the story-telling. There is evidence of basic story-telling, but I could definitely push it even further to make the scene more believable. I enjoyed the process a lot, especially the part where I was connecting all the dots from all the knowledge that I have been gaining for the past 2 years!